HowTo configure the deployment steps?
The concrete deployment steps are usually project specific so you have to define them.
Plainion.CI uses FAKE to support customization of the build process.
Plainion.CI provides various helpers for GitHub and NuGet out of the box.
Deploying with FAKE
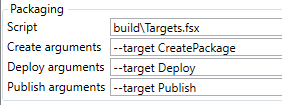
FAKE deployment scripts have to end with “.fsx”. To get started copy the following into your deployment script, e.g. “build\Targets.fsx”:
#r "/bin/Plainion.CI/Fake.Core.Target.dll"
#r "/bin/Plainion.CI/Fake.Core.Trace.dll"
#r "/bin/Plainion.CI/Fake.IO.FileSystem.dll"
#r "/bin/Plainion.CI/Fake.IO.Zip.dll"
#r "/bin/Plainion.CI/Plainion.CI.Tasks.dll"

open Fake.Core
open Fake.IO
open Fake.IO.FileSystemOperators
open Fake.IO.Globbing.Operators
open Plainion.CI

Target.create "CreatePackage" (fun _ ->
    !! ( outputPath </> "*.*Tests.*" )
    ++ ( outputPath </> "*nunit*" )
    ++ ( outputPath </> "*Moq*" )
    ++ ( outputPath </> "TestResult.xml" )
    ++ ( outputPath </> "**/*.pdb" )
    |> File.deleteAll

    PZip.PackRelease()
)

Target.create "Deploy" (fun _ ->
    let releaseDir = @"\bin\MyCoolProject"

    CleanDir releaseDir

    let zip = PZip.GetReleaseFile()
    Unzip releaseDir zip
)

Target.runOrDefault ""
Hint: Don’t forget to adjust the path in the first two lines to your Plainion.CI installation.
The script defines two targets. “CreatePackage” will delete “unwanted” files from your “bin” folder and then create a ZIP file under your “bin” folder. “Deploy” will take the created ZIP and deploy it under the specified “releaseDir”.
Publishing to GitHub
In order to create a new release on GitHub add the following code
Target.create "Publish" (fun _ ->
    let zip = PZip.GetReleaseFile()
    PGitHub.Release [ zip ]
)
above
Target.runOrDefault ""
Publishing to NuGet
In order to create a new release on NuGet change the “CreatePackage” target to
Target.Create "CreatePackage" (fun _ ->
    !! ( outputPath </> "*.*Tests.*" )
    ++ ( outputPath </> "*nunit*" )
    ++ ( outputPath </> "*Moq*" )
    ++ ( outputPath </> "TestResult.xml" )
    ++ ( outputPath </> "**/*.pdb" )
    |> File.deleteAll

    [
        ( projectName + ".*", Some "lib/NET45", None)
    ]
    |> PNuGet.Pack (projectRoot </> "build" </> projectName + ".nuspec") (projectRoot </> "pkg")
)
The “PNuGet.Pack” task will also generate a proper NuGet package spec from your template. Therefore
copy the following template under “build/
<?xml version="1.0"?>
<package >
  <metadata>
    <id>@project@</id>
    <title>@project@</title>
    <version>@build.number@</version>
    <authors>me</authors>
    <owners>also.me</owners>
    <licenseUrl>http://opensource.org/licenses/BSD-3-Clause</licenseUrl>
    <projectUrl>https://github.com/ronin4net/Plainion.CI</projectUrl>
    <requireLicenseAcceptance>false</requireLicenseAcceptance>
    <description>
      this is just a dummy template for testing
    </description>
    <releaseNotes>
      @releaseNotes@
    </releaseNotes>
    @dependencies
    <copyright>Copyright 2016</copyright>
  </metadata>
  @files@
</package>
Then add the following code
Target.Create "Publish" (fun _ ->
    PNuGet.PublishPackage projectName (projectRoot </> "pkg")
)
above
Target.runOrDefault ""
Hint: Publishing NuGet packages currently only works if you once followed the instructions here regarding APIKey and have stored your APIKey with “setApiKey”:
NuGet.exe setapikey <your api key> -source https://www.nuget.org/api/v2/package
Configuring the custom targets
Configure the created custom targets in the following way: